Checking your car’s engine oil can be a mundane task that can involve getting your hands dirty. As such, checking the engine oil is a car maintenance task that many of us neglect to carry out anywhere as frequently as it should be done.
Perhaps to gain an understanding of the importance of frequent engine oil checks, let’s answer the question ‘what does engine oil do?’ Engine oil performs a seemingly simple, but highly important task. Your car’s engine comprises of many metal components and when the car is running, all these metal components rub against each other.
To prevent direct metal-on metal contact which will result in friction generating excessively high temperatures and the corrosion of components, engine oil is used.
There is a little more to engine oil, but in short, it prevents your engine from seizing up that without oil, will happen in almost no time, rendering your engine nothing more useful than scrap metal. Not checking your engine oil regularly increases the risk of breakdown and if your engine seizes, the likelihood of a repair bill of £1,000’s. So if checking the engine oil is so important, how often should you check engine oil levels?
Ideally you should check your engine oil levels once each week, this is especially important the higher the mileage you cover. However, if your car is relatively new and is regularly serviced, checking your engine oil levels once each month should be sufficient. So, how do you check your engine oil?
Items needed for checking / topping up with oil
- The correct grade oil for your engine
- Funnel to help eliminate oil spillages when pouring, although this is optional
- Rubber gloves, again optional
Check engine oil level
For those that haven’t done it before, you’ll be pleased to know that it’s a fairly straight forward and easy process. Before checking the engine oil, you’ll need to take two preliminary precautions.
1. Ensure your car is parked on level ground
To ensure the oil inside the engine remains level to enable you to take an accurate reading.
2. Ensure your engine is switched off for at least five minutes
Enabling the circulating oil to settle at the bottom of the engine also to provide you with an accurate reading. If you are concerned about getting dirt or engine oil on your hands, you may wish to put on a pair or rubber gloves. The type that are used for washing dishes should be fine and can be reused for future oil checks.
3. Open the bonnet
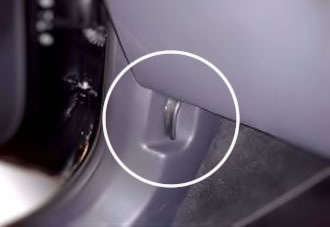
If you’ve not opened the bonnet of a car before, you’ll need to locate the bonnet release lever. The image on the right displays a typical location found within the passenger footwell. The lever may also be located within the drivers-side footwell. Tug the lever to release the bonnet.
Once at the bonnet, a secondary lever will need to be raised which is often located under the lip of the bonnet, usually in the centre area where the manufacturers logo is placed.
This secondary safety latch is a backup device in case the first bonnet lock fails and is to prevent the bonnet opening whilst driving. Secure the bonnet with the prop.
4. Locate the dipstick
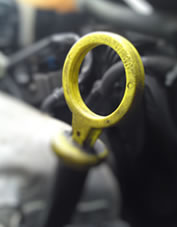
The device for checking engine oil levels is called the dipstick. The dipstick can be located almost anywhere under the bonnet, but they are designed to visibly stand-out such as the bright yellow dipstick in the image, and will have a small handle or ring for gripping to aid in removing. Pull out and completely remove the dipstick from its holding bay.

Wipe clean the end of the dipstick where the oil level markers are located and fully replace the dipstick back into its holding tube. Once again fully remove the dipstick and check oil levels against the minimum and maximum markers. If the oil level is close to the minimum marker, you should top up with engine oil.
5. Engine oil top up
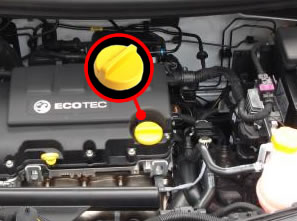
If you need to top up your engine with oil, you must locate the engine oil filler cap. The engine oil filler cap is usually located on top of the engine and as with all engine maintenance equipment, it will likely be brightly coloured such as the yellow colouring on the dipstick and engine oil filler cap in the images.
Ensure there’s no dirt or debris around the filler cap that may fall in once the cap is removed. Remove the oil filler cap. You may wish to use a funnel to eliminate oil spillages. Ensure you use the correct grade oil for your engine. Pour in a little oil, ensuring to to pour in too much. Wait five seconds or so to enable the oil to settle through the engine.
Remove the dipstick once again to check levels. Continue to fill with oil in small increments, along with repeated checks of the dipstick. Replenish oil until the maximum marker (or a little under) has been reached on the dipstick. This stage-by-stage procedure is important so as not to overfill the engine with oil. Over filling can cause strain on the engine seals when running and may cause seals to burst and leak oil.
6. Finishing the job
Ensure you securely replace the dipstick and the engine oil filler cap. It’s actually quite easy to leave the filler cap on the side and forget to put it back. When securing the bonnet, firmly push it down and ensure it clicks in place. Double check the bonnet is fastened by giving it a tug upwards to ensure it doesn’t move. The last thing you want is your bonnet opening whilst you are driving!
Symptoms of low engine oil
In our busy lives, many of us forget basic car maintenance such as checking the engine oil levels. As we know, running low on engine oil can have disastrous consequences for your engine, so keeping an eye and ear on symptoms of low engine oil may save your expensive engine from permanent damage.
The oil pressure dashboard warning light is a visual warning that action needs to be taken. Further information can be found by reading why has my engine oil warning light come on and the dashboard warning lights section. If you have an engine temperature gauge on your dashboard and your engine seems to be running unusually hot, low engine oil may be the cause.
Also if your car engine seems unusually loud, such as knocking sounds. This may be a symptom of low oil levels that are making your car engine components rub together due to a lack of lubrication.
A handy tip is to always keep in the boot a small, spare bottle of engine oil. If you do forget to check your engine oil regularly and you need the oil in an emergency, you know you have some in the back. If you do suspect your engine is running low on oil, pull over and turn off the engine as soon as is safely possible to reduce damage to your engine. Give the engine five minutes or so to cool down before checking or replenishing oil.
Engine oil top up maintenance
Here we look at the basic engine oil maintenance.
Engine Oil Dipstick
Part of a car owners responsibilities is basic engine maintenance. Engine maintenance includes checking the oil levels. The dipstick is used to check oil levels and although its location can be varied under the bonnet, dipsticks are often coloured brightly to enable them to be easily found such as the dipstick image to the left. The dipstick may require a firm tug to remove it from the engine.
Engine Oil Filler Cap
You will need to locate the engine oil filler cap if oil needs replenishing. As with the dipstick, the engine oil filler caps are often brightly coloured, usually in the same colour as the dipstick. The cap may also have the wording ‘engine oil’ or have the engine oil symbol on it. If in doubt, always refer to the car owner’s manual.
When should engine oil be changed
In modern cars, crude oil should be changed anywhere from 3000 to 5000 miles, or 3 months – whichever comes first. For synthetic oil, it should be changed anywhere from 5000 to 7000 miles, or 6 months – whichever comes first. Although there are certain oils that may extend this even further. If you do not know how many miles your car has done prior to its last oil change, take a look at the dipstick for an indication. This isn’t an exact science, but it may provide you with a visual clue.
New oil on the dipstick will be a translucent honey brown colour. If your oil looks like this, it’s good news as it didn’t have an oil change too long ago. Oil will soon start to darken however and before long look black in colour. this may happen from only a few hundred miles, although it may take more, it depends on the make, model of vehicle and its engine condition.
If the oil is black, examine the oil on a tissue or white cloth. Look for evidence of small particles in the oil. If small particles are detected, it’s probably time to have a service which includes a change of oil and filter. Also dab a small drop of oil and rub between finger and thumb. If you feel any grit, it’s time to change oil. To save on expenses, you can do this yourself, see how to service a car.