Learner drivers often find it difficult to assess distances between the car they are driving and external objects and structures. One such structure is the kerb and hitting the kerb during a driving test can easily result in a failure.
After a little driving experience, a learner will naturally gain the ability to accurately assess distances, but before this ability occurs, observational aids otherwise known as reference points help the learner by offering a physical object to compare distances over.
Driving test manoeuvres is one such area where reference points considerably help and here, we take a look at reference points specifically used for pulling up on the right.
Pulling up on the right, or parking up on the right is a new manoeuvre introduced to the driving test. These reference points should be used in combination with the pulling up on the right manoeuvre tutorial. For potential issues that may occur during this manoeuvre, follow the guide on pulling up on the right complications to see what issues may occur and how to resolve them.
Pulling up on the Right Reference Points
The following reference points may vary a little from car-to-car and may require a little adjustment compared to what you see in the images.
1. Pulling up on the Right
When pulling up on the right, ensure you avoid hitting the kerb or stopping too far away from it. Ideally a distance of 20 to 30 cm should be adequate. To make the reversing part of the manoeuvre easy, stop the car straight and parallel to the kerb and finish with the front wheels pointing straight ahead.
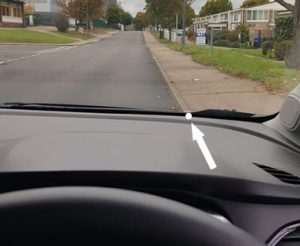
With assistance, stop the car on the right, straight and parallel and at the recommended distance from the kerb. Now make your own reference point based on the reference point shown here. Look at where the kerb enters the car windscreen and hits the dashboard. Where it hits the dashboard is the reference point.
When you move over from the left hand side of the road to the right, use a shallow angle and use this reference point to gauge where the kerb is on the right. Use this reference point in conjunction with ‘3. Pull Over to the Right’ on the manoeuvre tutorial page.
2. Pulling up on the Right / Reversing
This can be used as a secondary reference point for pulling up on the right (above) and for the reversing part of the manoeuvre.
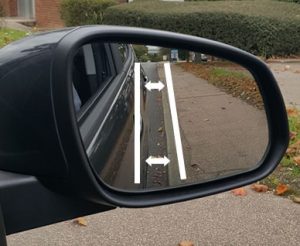
To make this reference point, stop on the right (with assistance if necessary) and look into your right door mirror. Providing you have stopped straight and parallel with the kerb and at an appropriate distance from the kerb, you should see something similar in your mirror to what is in the picture.
Take a mental photo of what you see in your mirror. Look at the distance from the kerb and how parallel the kerb line is with the car.
You can also use this reference point when reversing to ensure you remain parallel with the kerb and that you sustain a consistent distance from it. Use this reference point in conjunction with ‘3. Pull Over to the Right’ and ‘4. Reversing and Moving Off’ on the manoeuvre tutorial page.
3. Reversing / Looking Out the Rear Window
The final reference point if for the reversing part only and can be used alongside the reference point (2) above. As you begin reversing, you need to be looking out the rear window in the direction of travel – so it’s an ideal place to have a reference point.
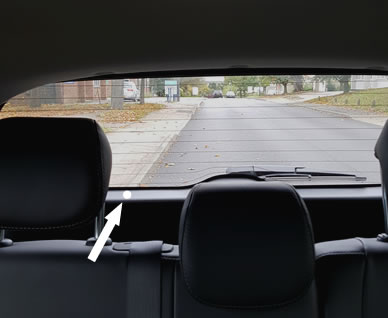
Look at where the kerb enters the car and memorise (or some people place stickers) this point. Again, it may look and be in a different place depending on the car you are using. Use this reference point in conjunction with ‘4. Reversing and Moving Off’ on the manoeuvre tutorial page.
Pulling up on the Right Tips
- If you start to go out into the road too much, steer towards the kerb to get closer to it and steer away from it to get away.
- Do the manoeuvre very slowly. It’s far easier to control the vehicle if it is moving slow.
- It’s tempting to focus your attention too much on reference points. Whilst the examiner wants to see good control, they also want to see a good standard of effective observation. Use your reference points, but also continuously look around at other vehicles and pedestrians and act accordingly. Providing you keep the car very slow, this can all be done.
Tutorial and Potential Complications
Below you can find the full pulling up on the right tutorial with an explanation of how to carry out the manoeuvre, plus reference points which are idea for test candidates to use.