The parallel parking or reverse parking manoeuvre as it’s also known has a reputation for being one of the most difficult test manoeuvres and as a result, fails a great many driving tests.
It’s important to use a structured technique and to practice this technique until a level of proficiency is reached so that each and every parallel park is accomplished successfully. It doesn’t have to be completed in one complete manoeuvre however as many think.
It is acceptable to move forward and make adjustments during the manoeuvre, providing this is done safely with constant all-round observation.
A structured technique is applied by use of reference points. There are several techniques that can be used for the parallel park, which ever technique used, using reference points aids learner drivers accomplish this manoeuvre.
These reference points are to be used alongside the main parallel parking / reverse parking tutorial which provides a complete in-depth guide on how to parallel park. Once you have studied this page along with the tutorial page, take the parallel parking quiz to test your knowledge.
Using the reference points
Many reference points taught whilst learning to drive can be vehicle specific, essentially using a particular point on the car to line up with the road or pavement. As a result, reference point markers may need to be altered slightly depending on your vehicle.
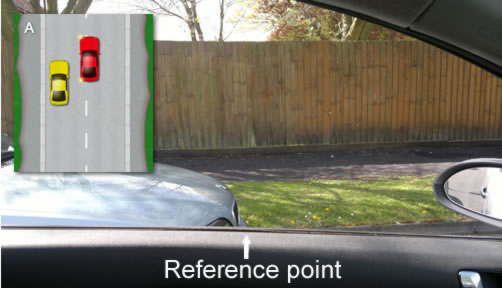
Parallel parking reference point A
Pulling alongside the car you wish to park behind, try and keep around 1 metre distance from door to door.
Drive past the car you intend on parking behind slightly. Reference point A shows the front of this car lined up with the centre of your passenger side front window. This reference point doesn’t have to be exact, although it provides a guide on where to stop.
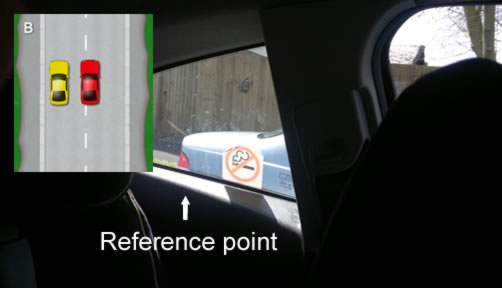
Parallel parking reference point B
As you begin to reverse back, reference point B will line the back of the cars up. There are a few ways to establish this. If the cars are the same length and facing the same direction, you may line the door mirrors up. Alternatively, the front (or back depending on which direction the car is facing) up with the centre of the rear left window.
This must be completely the end of the vehicle lined up, such as their bumper. Sit up straight as you can as is may be a little difficult to see the end of their car. With plenty of practice, you will estimate this accurately.
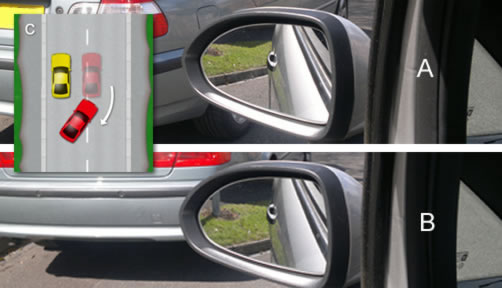
Parallel parking reference point C
Reversing now, you will turn the wheel one complete turn to the left. Keep this part of the manoeuvre extremely slow as it’s important not to over-shoot this reference point.
As you reverse, you will see a triangle form in the left door mirror between the kerb and the side of your car as can be seen in the ‘A’ part of the diagram. As you reverse, the triangle will get smaller. Keep reversing until the triangle nearly disappears. When you can only see a tiny triangle such as in the ‘B’ part of the diagram, stop the car.
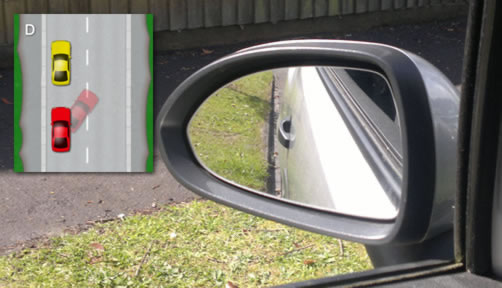
Parallel parking reference point D
At this point now, the rear wheel will be very close to the kerb so you just want the front of the car to swing round to the left parallel to the kerb.
Steer full right lock just as you begin moving slowly backwards. Steer immediately and as quickly as possible as you may risk the rear wheel hitting the kerb.
The final reference point is to use the left door mirror and wait for the kerb and the side of the car to become parallel with each other as shown in the diagram. Just as you see they are nearly parallel, steer one turn to the left to straighten the wheels and stop the car.
Parallel / reverse parking tips
Along with using reference points for the parallel parking manoeuvre, here are some key tips to help you succeed:
- Keep the car extremely slow
- Constantly check reference points. If you miss a reference point or over-shoot one, drive forward again if necessary to re-establish the reference point.
- Constantly look all around for approaching vehicles or pedestrians and stop if necessary. If this isn’t done you will fail the manoeuvre and the entire driving test.
- If the manoeuvre did not finish correctly or you hit the kerb, ask if you can try again
Guides and tutorials related to parallel parking
- Straight reverse
- Turn in the road
- Reverse round a corner
- Parallel parking / Reverse parking
- Parallel parking quiz test
- Bay parking
- Hit the kerb
Hi, can you please explain to me why you pull at reference point A, then reverse back to ref point B? Why not just stop at ref point B and then turn left from there? Is there an intelligent reason for it? Many thanks
Hi Daniel.
You can simply stop at reference point B to start with, but you’ll often find that a learner driver overshoots the reference point, so it provides a starting point if that were the case. Also, by stopping at reference point A (or thereabouts), then reversing to point B, you’ll be looking in the direction that the car is going in. If you were to stop at point B as you were pulling up alongside, you would need to be looking out the rear when the car is moving forward.
Hi So I live in MA, Can you please explain what is the best starting point and the best reference to start turn to the left ? And if I can use the same method on any size car
Hi Jennifer,
Yes, you can generally use the same reference point on any car, but it may need to be slightly altered depending on the car size. The point in which to start turning left is when the door mirrors line up. This is usually quite accurate. One complete turn of the wheel. So, turn the wheel, all the way round until it looks the same again. You may need to alter this slightly. Try it with the mirros lined up, if it doesn’t work quite right, you may need to go slightly further backwards. Keep trying until you find the perfect refence point for your car.
Hi there. Was wondering what book are you getting the diagrams from for all the tutorials as they are really clear.
Thank Craig
Hi Craig,
The diagrams are made by ourselves.