Reverse bay parking is one of possible four manoeuvres that the examiner can choose during your practical driving test and it’s a manoeuvre that you will need to learn before taking the driving test.
Bay parking is a manoeuvre that many struggle with, but fortunately it’s less likely on the driving test compared to other manoeuvres due to not all driving test centres having bay parking bays available. On occasions however, you may travel to a different test centre that has bay parking facilities to conduct the manoeuvre during your test providing the centre in close enough.
This step by step tutorial will offer a technique with diagrams that should enable you to pass this part of the driving test providing it is followed as guided. Reference points, or ‘markers’ are a valuable aid in completing a manoeuvre successfully and as such, we off the bay parking reference points guide.
Note; this tutorial is for reversing into a bay. The new driving test now includes driving forward into a bay and reversing out which is a separate tutorial.
There are no rules to the bay parking manoeuvre as such, although during the driving test, the examiner will be looking for you to demonstrate 3 important key points. These are:
- Accuracy – To successfully park in a bay within the lines and not too close to a car on either side.
- Control – By keeping the cars speed under control by use of clutch control and by use of effective steering.
- Observation – Constant all-round observation throughout the bay parking manoeuvre.
Prepare, Observe and Move
Significant importance for the bay parking manoeuvre (or any manoeuvre) is to Prepare the car, Observe your surroundings and then Move if safe to do so (POM). See driving routine POM for further information.
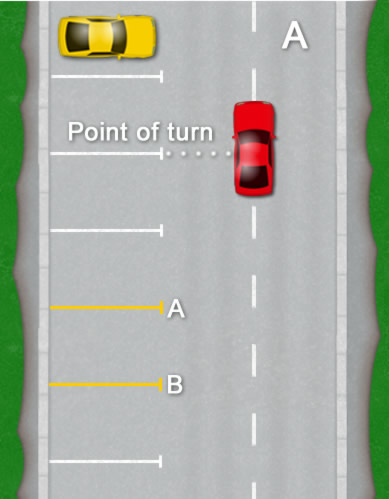
A. Positioning and Reference Point
As illustrated in diagram A, position the car in the centre of the road. Don’t worry where the point of turn is at the moment, concentrate on ensuring your car is reasonably in the centre of the road. This will give sufficient distance from the bays you will be parking in by making the turning circle wider and therefore easier to manoeuvre and observe. Plus, it will give sufficient distance to the right for when the car swings out, avoiding any obstacles such as kerbs or fences for example. Once you are happy that you are in the centre of the road, stop the car. If you are on a slope, apply the handbrake. Select reverse gear regardless of other vehicles or pedestrians. Your reversing light will be illuminated showing them your intention to reverse the car.
You will now need to reverse the car to the point of turn. The reference point may vary slightly from car to car, so you may need to establish your own reference points. Before starting to reverse the car, take all round effective observation to ensure you are clear from other vehicles and pedestrians. If you are happy it’s clear, it is important you look out of the rear windscreen as this is the way you are travelling (you’ll fail if you don’t). Very slowly reverse the car. Imagine a slow walking pace as an indication of speed. You will need to be looking out for the reference point and also looking around in all directions whilst reversing the car. See bay parking reference points for further information.
Bay parking point of turn reference points
Choose one of the parking bay lines as illustrated in diagram A and line it up with the centre of your front passenger door and stop. When you turn full left lock, this will guide you into the 3rd bay from the line. Ideally, the car park will be empty. If that is the case, choose which ever reference line you wish. If there are other cars in the bays, you may need to calculate which reference point line you will need to guide you into your chosen bay.
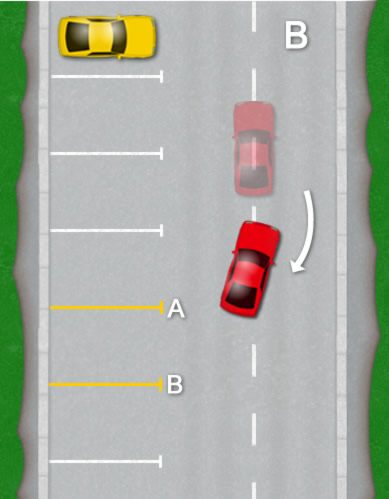
B. Quick Steering, Slow Car
You have reached the reference point and stopped the car. It is not compulsory to stop the car at this point, however by doing so it breaks the manoeuvre down into sections which makes things easier. It will also remind you to look at important areas that can be a deciding factor of if you pass or fail the driving test.
Now that you have stopped at the reference point of turn, apply the hand brake if you are on a slope if you feel that the car may roll. At this point, you will need to steer the wheel briskly to full left lock. Before you do this or move the car, it is essential that you take a good look around to ensure the area is clear, then take a look in your right blind spot as the front of your car will swing out. Once you’re happy all is clear, look out of the rear windscreen, move the car gently backward. As soon as the car moves, steer full left lock.
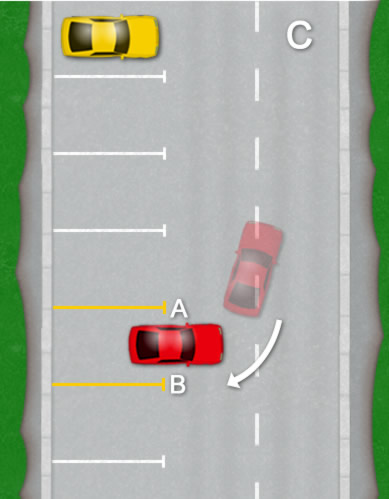
C. Observation and Reference Points
This part of the bay parking manoeuvre is the most difficult, so ensure you keep the car very slow. If at any time you are not sure of your position, stop the car to re-evaluate.
As you are slowly reversing, constantly look around in all directions, including the rear windscreen and the blind spot to the right. If any pedestrians or vehicles get close, stop the car. If they are going to go past, wait until clear before proceeding. If they stop and wait for you, then continue.
Continuously perform all-round observation and as the car begins to turn, keep checking the left side mirror as you should see yellow line ‘A’ beginning to appear in it (reference point diagram C). You will be able to establish how close or far you are from this line by using this mirror. The closer the car heads towards the bay, you will see yellow line ‘B’ appear in the right mirror. It’s essential you keep looking around and keep checking reference points – that’s a lot of looking, so ensure you keep the car very slow to fit it all in!
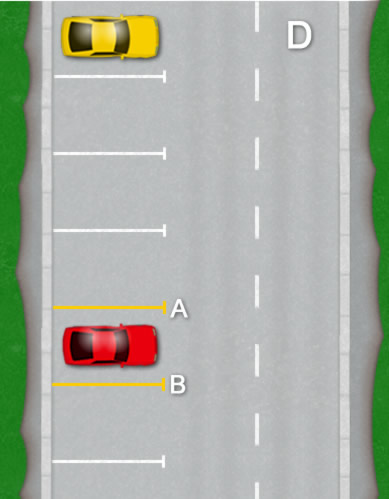
D. Finishing Off and Adjusting
As soon as line A and B look parallel with the car in the side mirrors, straighten the wheel up. It’s usually about a turn and a half of the steering wheel to straighten up from a lock. Remember, if you need to adjust, steer towards which ever line you want to get closer to.
For a final reference point, the very end of line B (diagram D) should line up with your right side mirror. Using this reference point will prevent you from going too far back, hitting a kerb at the rear (which is also a failure). Using these reference points should help a great deal for the bay parking manoeuvre. As previously said, the reference points may need to be altered slightly for different cars and seating positions. Once you have stopped the car, apply the handbrake and select neutral.
Bay parking techniques
This is just one bay parking technique that works well. There are other techniques, but providing you do the manoeuvre safely by keeping the car slow and do plenty of all round observations, it doesn’t matter which technique you use.
Bay parking to the right
This bay parking tutorial is designed for parking to the left. The same technique can be applied to bay parking on the right. The difference being that the reference point of turn will be out of your window and not the passengers. See bay parking reference points for additional help on establishing reference points.
Rolling the car
Car parks are most often level, on some occasions there may be a slight slope. Rolling the car in the direction you don’t intend on going is classed as a loss of control by the examiners. Ensure you use the handbrake and gain the bite point every time you stop if there is a slope. This will eliminate the possibility of rolling the car.
Plenty of time to bay park
Generally, you have about 4 minutes for a manoeuvre. This is actually a long time and most learners don’t need that time. Use as much of that time as you can. Keeping the car as slow as possible will higher your chance of being accurate will reference points and to look around constantly.
How to bay park help and tips
Below are help and tips to enable you the best chance of the bay park manoeuvre during the driving test.
Manoeuvre stress
The car park of the test centre will ideally be quiet with few cars in the bays. It may however be rather busy with cars coming in and out. If other vehicles are waiting for you to get out of their way, don’t speed the manoeuvre up get out of their way. It is a test centre after all and they are likely to be aware that you are on a test and will be more than happy to wait. By doing the manoeuvre too quickly will likely result in doing something wrong.
Persevere with the manoeuvre
If during the bay parking manoeuvre you have over shot a reference point or when finished, you think you are not within the bay lines, explain to the examiner that you are going to pull forward a little to correct. Providing you do it all safely, all should be good for a test pass.
If it all goes terribly bad and say for example, you hit a kerb abruptly, then a test fail is likely. Some examiners can be more lenient than others however, especially for manoeuvres. Ask the examiner politely is you can try the manoeuvre again. Depending on the examiner and time permitting, they may well let you.
Approaching vehicles and pedestrians
The best controlled and accurate bay park ever made will still fail the driving test if you don’t observe what is around you and react on it if appropriately. Keeping the car slow is essential so you can look around in all directions continuously. If any vehicle or pedestrian approaches you, stop and allow them to pass before you proceed. If they are waiting then proceed.
ADDITIONAL INFORMATION
For a guide to establish reference point and markers, see:
For tutorials on all test manoeuvres, see:
Popular myths
Myth 1
It is often thought that you must finish completely straight and parallel with the lines in the bay and in the centre of the bay between each line. This is not the case. It is fine to finish at an angle in the bay and not straight. Providing you are in the bay lines, then all is good. If the examiner isn’t sure you are within the lines, they will exit the car to check.
Myth 2
The manoeuvre has to be completed in a single move without adjustment. Again not true. As you are reversing towards the bay and feel it is going off-course, they are more than happy if you pull forward to correct.
Well on my test I wasn’t allowed to straighten up, she told me to drive on and I said I hadn’t finished, she then told me I had failed.
She done the manoeuvre at the start of the test straight after I told her I was nervous
Hi Joanne,
During the driving test, the bay parking manoeuvre is based on real-life situation. Most people in day-to-day life need to adjust in order to access a bay. The point of the manoeuvres isn’t to see if you can do it first time, but to complete it safely and in a reasonable time. I would suggest that you take your instructor with you on your next test and make a complaint if you’re not given a fair chance.
sorry, may not have read the article properly but is it absolutely certain that the reverse bay park only happens in a test centre?
Hello Rogan,
Yes that’s right. But I have heard that the odd examiner does things a little differently, so probably best to expect the unexpected.
ok thanks
erm another query i have is that my instructor is having to have a replacement car because his has gone wrong:
a) my test is on monday
b) i’m having to have that replacement car for my test
c) I have a 30 minute lesson on friday and an hour lesson on monday before my test (in the replacement car)
….do i still have a chance to pass my test??
Is it the same make and model of car? If not, it will be very different to drive and manoeuvres will require practicing in a different car. You have the show me tell me questions to consider too (controls in a different place) I would certainly try to get another lesson or two in before your test due to the different car.
Hi. Can you let me know if the above also relate to PDIs, or MUST the maneuver take place in one smooth move?
Hi Julie,
A PDI should do it in the same way in terms of safety / observations, but the examiner would expect a PDI (an already experienced driver) to complete the manoeuvre a little faster and more confidently than a learner driver. It doesn’t have to be completed in one smooth move though.
In reply to #Rogan.
Exactly what I was going to ask. Because in our local test centre there’s no Bays but Ive been told by my instructor say they use supermarket parkings.
And we are extra considerate when a Learner is attempting a manoeuvre in these areas, they might be on their test.
Hello on the test can you do ‘less than 90 degree’ reverse bay parking.
For example pulling over to a 45 degree angle and reversing back into the bay?
Thanks
Hi James,
Sure, shouldn’t be a problem. Essentially the examiner is just looking that you complete the manoeuvre and that you do it safely and under good control.
Hello, I just wanted to know whether it would be okay to ask the examiner whether you are in the lines
Hi,
Sure, you can ask the examiner. But really, it’s for you to know this. Rather than ask the examiner, I would check yourself by opening your window to take a look down at the lines (you can do this during the manoeuvre), or opening your door to check if you’re within the bay lines (only do this once the manoeuvre is completed).
If you do open your door at the end, check around to ensure that it’s safe before doing so and ensure that the car is safely secure. You can also lower your mirrors just prior to the bay parking manoeuvre to have a slightly better view of the bay lines. If you do, ensure you readjust the mirrors before moving off once the manoeuvre has been completed.
If you’re not totally sure whether or not you’re within the lines whilst carrying out the manoeuvre, it’s best to make adjustments (such as pulling forward a bit) while doing the manoeuvre, rather than not being sure at the end.