The turn in the road is one of four manoeuvres that was taught before taking the driving test. The turn in the road, also known as the 3 point turn was frequently asked to be carried out during the practical test, but is no longer part of the syllabus.
The turn in the road has been replaced by the pulling up on the right and forward bay parking manoeuvre. This tutorial will demonstrate an ideal technique or example, fully explained with instructions, that the examiner will be looking for in order to pass this part of the driving test.
A good driving school or instructor should explain the manoeuvre step by step and provide you with plenty of reference points to make the turn in the road procedure easier for you to complete successfully.
By performing the turn in the road on your test exactly as described in this tutorial, you will pass this section of the driving test with considerable ease.
For a brief summary, the test examiner will be looking for 3 key skills demonstrated by yourself in order to successfully complete the turn in the road. These are:
- Accuracy
The test examiner will be assessing your ability to ideally turn the car around in 3 points without touching the curb / kerb or mounting the pavement. This can be extended to 5 turns if necessary. - Control
The examiner will be judging your ability to keep the car slow by use of clutch control and simultaneously steering quickly. - Observation
Effective and all round observation must be taken whilst performing the turn in the road manoeuvre.
Prepare, Observe and Move
A key factor within the turn in the road (or any manoeuvre) is the driving routine POM; Prepare, Observe and Move (or Manoeuvre). Always prepare the car to get it ready to move, before moving it, observe to ensure it is safe to move, and when you are sure it is save, move. This is required from the first turn, through to the last turn.
How to do the Turn in the Road
1. Park on the Left
Throughout the driving test, the examiner will ask you to park on the left on more than one occasion. This is to ensure you do so safely by using main interior mirror, your left mirror and if necessary, signalling to the left.
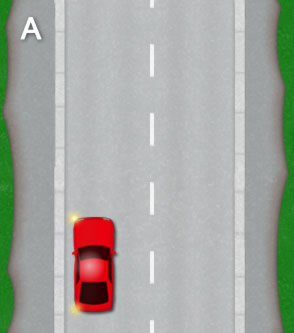
The examiner will not ask you to park anywhere that is illegal, although do ensure to avoid parking in front of somebody’s driveway, on sharp bends and opposite a junction. Once you have stopped the car, apply the handbrake and select neutral.
Other than testing your ability to park safely on the left, it may be to perform a driving test manoeuvre such as the turn in the road. The test examiner will provide a briefing, explaining to you that he would like you to ‘turn the car around’ or make a ‘turn in the road’ or to perform a ‘3 point turn’.
2. Full Steering Lock to the Right
Before you start the turn in the road, look into your main mirror, right mirror and look into your right blind spot. An indication will not be necessary as you will only want to start the turn in the road manoeuvre if the road if clear of approaching vehicles. If the road is not clear, wait until it is, but ensure you make full checks again before starting the manoeuvre.
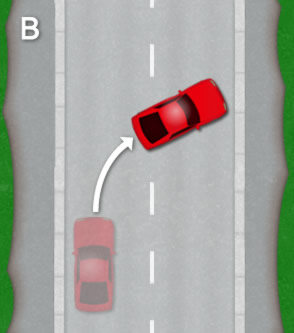
Move the car off very slowly using clutch control. Think of a slow walking pace for speed. As soon as the car moves forward, steer as fast as possible to full right lock. Approximately 1 metre from the kerb, turn the wheel to the left approximately 1 turn. It is not essential that you do this, it simply helps to straighten the wheel for when you begin to reverse and makes the manoeuvre a little easier.
To give yourself an idea when the car is 1 metre from the kerb, estimate or ask someone to tell you when you are approximately 1 metre from the kerb, then you will need to establish a reference point. For example, look at what point the kerb you are driving towards reaches the car and remember that reference point.
Observations are important throughout the manoeuvre. Keeping the car slow, as you approach the kerb, keep checking up and down the road for approaching traffic. Once you have turned the wheel to the left, fully depress the clutch and gently brake to a stop. Apply the handbrake and select reverse gear.
3. Slowly Reverse
To ensure the car will not roll forward into the kerb, find the clutch bite point. Before moving the car, take a good look up and down the road at least twice each way for any approaching vehicles.
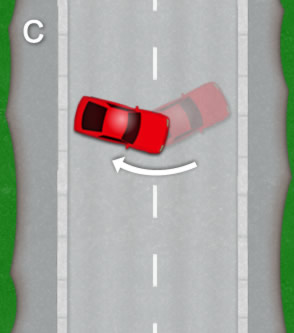
If all clear, look out the rear windscreen and using clutch control, slowly move the car backwards and steer as fast as possible to left steering lock. Again keep the car slow whilst moving. Your main observation should be out the rear window but also constantly check up and down the road for oncoming vehicles.
Approximately half way in the road, your attention should now be over your right shoulder at the approaching kerb. This is now the closest to the car and so is the most dangerous due to mounting the kerb. Approximately 1 metre from the kerb (again establish yourself a reference point here) steer 1 turn to the right, depress the clutch and gently brake to a stop.
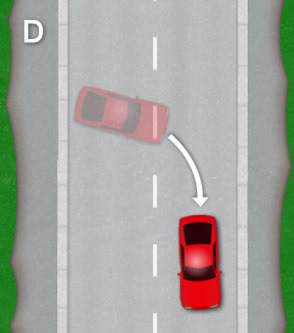
4. Slowly Move Off
Apply the handbrake, select 1st gear and to prevent the car from rolling back, find the clutch biting point. Before moving the car off, take a good look up and down the road at least twice each way to ensure it is safe to proceed. If all clear, release the handbrake and move the car off slowly and steer as fast as possible to the right.
Note; a driving instructor will usually start manoeuvres at around 10 hours into your driving lessons, perhaps less if you are a competent driver. Manoeuvres often start with the turn in the road / 3 point turn. Your driving instructor should give you a good idea of how many driving lessons you will need to reach test standard.
Rolling the car
Although it is not compulsory or a rule to apply the handbrake and bite point at each stop in the turn in the road, it is a good habit to get into. Many roads have cambers such as on the diagram to aid with water drainage. See road camber for a more detailed explanation of road cambers.
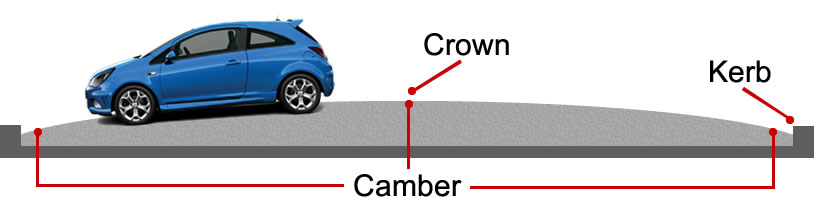
Cambers can sometimes be difficult to see for a learner and can easily result in rolling into the kerb. At each stop apply the handbrake and find the clutch bite point to ensure this will not happen.
Take the turn in the road knowledge test
Once you have read through the turn in the road tutorial, take a look at the turn in the road knowledge test. This simple test allows you to check if you understand the safety fundamentals for the turn in the road procedure.
- Take the turn in the road knowledge test.
Turn in the road help and tips
Listed are some tips and advice on how to perfect the turn in the road during the driving test.
-
Getting stressed
The test examiner may use a relatively busy road for you to perform the turn in the road. Vehicles may come close, try to get passed or become impatient. It is important that you are fully practiced with this manoeuvre so that under pressure, you are fully aware of what you should be doing. Remember that they all had to do the driving test once, so keep calm and do the manoeuvre just like you did with your driving instructor.
-
Don’t give up
The examiner isn’t expecting you to drive like a professional. He is expecting you to make mistakes. If for whatever reason you think you can’t make the turn or you may hit the kerb, don’t risk it. Turn it into a 5 point turn. You may possibly incur a minor if the road is easily wide enough to make it in 3 turns. Gaining a minor is obviously better than risking hitting the kerb, so providing all is done safely, you should pass this part of the driving test.
-
Approaching vehicles
There are no rules for the turn in the road as such, it’s all about safety. Constant all round observation is a must and if there is a lack of, then certain test failure is imminent. If you see an approaching vehicle, stop the car. Assess what it is going to do. If it is going to stop and let you continue the manoeuvre, then proceed. If it is going to try and get round you, then remain still until clear. This also applies to cyclists and pedestrians that may be in the direction your car is moving.
-
Indication and signal
During the turn in the road manoeuvre, there is no need to provide an indication or signal. If there are any approaching vehicles or cyclists, wait till all is passed, perform all round observation and if clear, proceed with the manoeuvre.
Tutorials related to the turn in the road
- Straight reverse
- Turn in the road knowledge test
- Reverse round a corner
- Parallel parking / reverse parking
- Bay parking
- Hit the kerb
How up to date are these notes – excellent as they are?
Is a 3 point turn and reversing round a bend STILL part of the test in 2020?
Hello Harold,
No it’s not longer part of the driving test. That information has been updated at the top of the page. Some instructors can choose to teach it if they wish as it is still a practical manoeuvre that is commonly used.
I just got back from failing the driving test in cookstown, 3 point turn was the maneuver they took me